Monday, September 30, 2013

Year of he Rabbit Sister Stamp

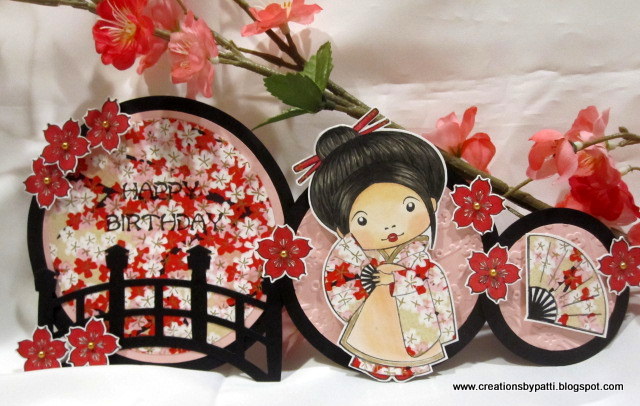
THIS is the last of the Sister Stamps Zodiac series: the Year of the Rabbit. For this last Zodiac release, I had to make something using RED as the base color.  The Washi paper used is from Hanko Desgns.  White and Red card stock is from Recollections. Flannel-like Flowers are purchased from Stamper's Corner made by CR Trimmings. In fact, Stamper's Corner has the largest selection of wonderful embellishments and charms perfect for card makers and scrap bookers. Each panel is connected with a small red brad.  Red eyelets are used for the top and bottom of the project. A small cord is used to hang the project.  A red rayon tassel from my stash is at the bottom of the project.
Total length is 12" long excluding the tassel:
The first panel has the Rabbit Kanji using Recollections red and white card stock. You can see the felt flowers more clearly in this photo.  The white flowers are made using a small Sakura Flower punch with an adhesive pearl in the center. This section is 4-3/4"
Copic markers used: G07, G21, G24, G99, W1, W4, W5, W6, R29, Y17, E000, R11, R83. yes, the various shades of green grass is using the flicking of the brush end of the marker. The stones are made by depressing the brush end of the marker. Size is 4-1/4".
The Bunny head is stamped separately, then cut and popped with foam squares.
Year of the Rabbit is cut using Recollections red card stock from my Silhouette using Arial Font, welded in the Silhouette program and a shadow (white card stock) made. Size is 3-1/2".
This is the larger Martha Stewart Butterfly punch using Vellum card stock I had in my stash. Finish the butterfly with adhesive pearls:
And, here is the smaller Martha Stewart Butterfly punch and adhesive pearls:
Hope everyone has enjoyed this and all eleven other Zodiac postings.  This is a great series to have for using not just each horoscope year but for other types of cards, too.
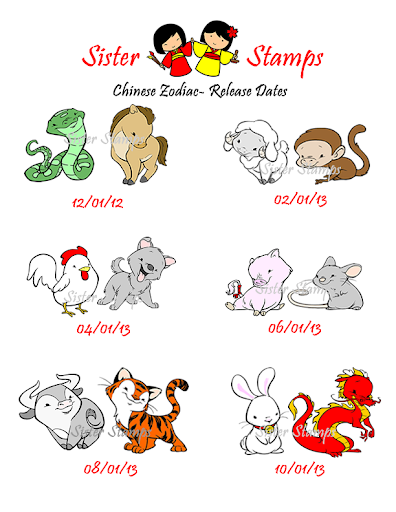
Now hop on over to the other participants who also have some fabulous projects for thsi last release in the Zodiac series:
SS Blog:  
http://sisterstamps.blogspot.com
Patti:  http://creationsbypatti.blogspot.com (you are here)
Eunice:  http://astarforchiemi.blogspot.com
Laura:  http://bytkg.blogspot.com

Linda: http://simpleandsassycreations.blogspot.com

Sunday, September 29, 2013

Year of the Dragon Sister Stamps

Where has the year gone? It's that time again so are you ready for the Year of the Dragon Zodiac release? This will be one of the last 2 releases of the Sister Stamps Zodiac series.  So I wanted to make this card with my favorite colors: Red and Gold. card style is a easel card but it is using acetate for the face of the card.  Kelly Gold card stock paper and Recollections Red card stock used. Randomly placed Gold coins from my stash show through the acetate easily.
The acetate folds up easily shown  here:
The Dragon Kanji is a theme that has been kept throughout my Sisters Stamps Zodiac series. In order to emphasize the year, it is cut using SCAL with Recollections Red card stock along with the Gold Kelly paper.  Adding red Stickles really made it pop. Attach the Dragon Kanji with adhesive dots onto the acetate.
Dragon is stamped using Momento Black Tuxedo ink on Neenah White card stock. Copic colors used: R29, R39, YR09, Y38, Y19, E44, E34, W4, W5
The popped up frame frame is a Silhouette cut file from their on line store called "Decorative Frame Shape". It has been re-sized to 1-3/4" x 3" with a computer generated message using Chow Fun font on White card stock.
Side view:
 
Stay tuned and come back tomorrow to see the Year of the Rabbit project.
But now hop on over to the other participants for the last of the series in the Zodiac release:
SS Blog:  
http://sisterstamps.blogspot.com
Patti:  http://creationsbypatti.blogspot.com (you are here)
Eunice:  http://astarforchiemi.blogspot.com
Laura:  http://bytkg.blogspot.com

Linda: http://simpleandsassycreations.blogspot.com

Friday, September 27, 2013

Hello Gorgeous Step Birthday Card

The Grand Nieces are growing up. This one is now 13 years old so cutesy cards no long apply - how about a step card with some wishful glamorous girly products? Here's what I came up with: the Center Panel Step Card is a Silhouette cut file found on their on line store. Measurements for manual cutting can also be found on Splitcoast Stampers here.
Nail Polish SVG cut file from My Scrap Chick found hereOther SVG elements on the card are from Miss Kate Cuttables found here. This is a A2 size card. The elements are popped with foam squares.
Another view:
A Crystal Sakura gel pen is added to the cut stars - added some bling to it. The metallic grey paper used is from Recollections Metallic Pack. The adhesive rhinestones around the center step is from my stash - worked out great. Background paper is a variety of high heel shoes found in my stash.
A white gel pen is used around the lips. Sakura crystal pen used in the lip.
Mirror has a little white gel pen effect and also a tied silver elastic cord.
On the left side is the nail polish embellishment, a make-up case, a compact case and lipstick.
Card inside: computer generated birthday wish message:
Side view of the card:
Thank you for stopping by today.......................


Wednesday, September 25, 2013

Kimono Marci with Fan Birthday Card

So here is another Asian card using La-la Land Crafts stamp set called Kimono Marci with Fan found here. The La-la Land bridge die is cut in black card stock and can be found here.  This is called a telescoping card: tutorial can be found on Splitcoast Stampers here. I made my card using the following measurements:
Circle sizes: 4-1/2", 3-1/2", 2-1/2"
inner circles: 4", 3", 2"
Washi circle: 3-3/4"
Paper used is Recollections Black, Recollections Pink, Washi paper from Paper Intelligence #0046-558 www.paper-intelligence.com
Happy Birthday stamp from Sprinkle and Sparkle. Embossed using black powder to stand out. The Sakura flowers are stamped, Copic colored, then popped with foam squares along with Mark Richard adhesive pearls.
Copic colors:
Hair: W1, W4, W6, W7, W8, W10
Face: R20, E000, E00, E01, E11
Dress and fan: R00, R01, R11, R20, Washi paper piecing
Mark Richards Gold Adhesive Pearls
Int he stamp set is a separate fan - Washi paper pieced and popped with a foam square.
Here's the card all "closed" up............Marci is peeking out of the first circle and the Sakura flowers are surrounding the card.
Thank you for stopping by today and hope this will inspire you to make some fun cards today.
 

Monday, September 23, 2013

Marci with Lantern Pocket Card

Another cute Asian card today:The Marci with Lantern stamp is from La-la Land Crafts given to me by my friend, Eunice (A Star for Chiemi).  As previously mentioned, she has inspired me with this stamp set.  This card style is a simple pocket card. The base paper used is from Stampin-Up Real Red card stock for the base and Pretty in Pink for the front pocket. Front pocket is embossed using Darice Cherry Blossom embossing folder. Marci's dress is paper pieced using Washi Paper from Hanko DesignsCopic colors used: E000, E00, E01, E11, R20, R35, R46, R81, R83, W1, W4, W5, W8, W10. Marci is popped with foam squares.
The removable card in the pocket is 4-3/4" x 3-3/4", White mat size is 4-1/2" x 3-1/2" stamped with the lanterns using Momento Tuxedo Black ink on Neenah White Card stock.
Here's a closer look at Marci: I did use a Sakura Clear crystal gel pen on her collar trim and button knots
The stamped message is using the Stampin-Up small scallop punch and small Oval punch - then popped with foam squares.  Stampin-Up Old Olive grosgrain ribbon is wrapped around the pocket.
To make this card:
Cut (1) 6-3/4" x 5-1/2" Card stock, score at 2-1/4" for the pocket
Cut (1) 5-1/4" x 2" contrast card stock for front pocket
Cut (1) 3-3/4" x 4-3/4" Card Stock for inside removable card
Cut (1) 3-1/2" x 4-1/2" White mat
Punch (1) Small Scallop Oval
Punch (1) Small Oval
(1) stamped and colored image, apply foam squares to bottom half of image

Adhere sticky tape as shown to make pocket and attach embossed contrast front panel.
  Thank you for stopping by today...............maybe another Marci card coming?

Friday, September 20, 2013

Kimono Marci Easel Card

Hey y'all...............here's a cute Asian Thank You card I made for a few friends.  The Kimono Marci stamp is from La-la Land Crafts given to me by my friend, Eunice (A Star for Chiemi).  Look what she did...she has inspired me with  this stamp set as well as the dies shown in the card.  The Pagoda and Bridge are all part of dies from the La-la Land Crafts collection found here.  The cloud die is from Taylored Expressions and can be found here. I had so much using this great gift from Eunice.  This card style is a easel card. The paper used is from Graphic 45 Bird Song Collection: Jasmine Dream. The Pagoda is cut using Stampin-Up Cherry Cobbler card stock. The bridge is Recollections Kraft card stock using a brown inked wood grain stamp. Copic colors used: E000, E00, E01, E11, R20, R39, W1, W4, W5, W8, W10. Umbrella is paper pieced using Graphic 45 Bird Song Collection: Shanghai Girls.  Dress is Graphic 45 Bird Song Collection: Tranquility. To add some sparkle, add some Yellow Stickles for the cuffs and front.
The easel card was made using the largest Scallop Circle (4-1/4") from Spellbinders. Inside circles are also using the Large Circle (3-3/4") die from Spellbinders. Tutorial on how to make an easel card can be found on Splitcoast Stampers here.
Side view of easel card: 
Inside stamped message is a stamp from Kimono Marci with a Fan - FYI: La-la Land Crafts will be making a correction to the stamp which should be with one "r" (Arigato). Use the Large Oval punch from Stampin-Up. Stampin-Up Scallop Oval punch on Cherry Cobbler card stock also used here. Pop it up with foam squares to make the easel effect.
Here's a closer look at the dress with the Yellow Stickles:
I love how this card turned out by using a couple die elements and the stamped image.  thank you for stopping by today to visit........more Marcie stamped projects coming.


Wednesday, September 18, 2013

Thanks a Minion Card

OK - this has got to be the crazy-est card!!!! But it sure was fun!  AND, if you are lucky enough to own a Silhouette Cameo cutter with the Designer Edition, then you can download for FREE this SVG cut file from Shirley at her blog Okieladybug.com . The Minion SVG cut file can be found here. These guys are so cute! On the front cover, he is about 3" tall and popped up with foam squares........love those hair spikes that are also cut out using my Silhouette. Paper used is a red card stock from Recollections along with Darice Bubbles embossing folder. The nesting label and the nesting arrow are cut files from the Silhouette on line store. Pattern paper is from my stash.
A closer look: adhesive beads are used for the buttons on the suspenders.  The protective eye ware is cut using Recollections Metallic Silver. And, don't you just love that sliver of a smile - I am impressed it was able to be cut so thin.  Pocket on the suspenders was colored using a Copic marker because I did not have the right darker blue card stock to match.
Open the card to reveal a Thanks Pop Up Die is designed by Karen Burniston made by Sizzix.  The die can be found here. Words "THANKS" was re cut using contrasting decorative paper.  Other words were cut using Arial Font and welded using the text feature on the Silhouette.
This Minion is leaning on the pop-up above the "THANKS". I had to bend his hands and foot just a little so he would fit when the card is folded.
The bottom expressive Minion with his hands on his hips - love the one eye and the hair spikes!!!!
Side pop up view:
Here's the additional pop-out I added by cutting 3/8" deep x 1/2" wide to support the leaning Minion.

I will be definitely using this Minion cut file again. thank you for visiting today and hope this post will inspire you to craft and be happy while doing it, too.

Monday, September 16, 2013

Cutest Gift Received

From my new craft friend, Arleen, I received this cute ensemble of gifts: a file folder holder and an assortment of note cards:
File folder container is 2-1/4" x 3-1/8"  x 3/4" (small).  Paper used is a beautiful Sakura blossom print with gold accents.
The small file folders are 2-3/4" x 2-1/4".Have you ever ever seen such tiny tiny little paper clips, too?  Oh my, they are really small. Total length is only 1/4" long on one side and 7/16" on the other side.  And, don't you just love that penguin clip, too?
The assortment of 4" x 2-3/4" note cards is attached using one of those Tim Holtz clasps:
There are ever so small scalloped edged note cards in each pocket (peeking out) - can you see the re-enforced clear circle for the punched hole?  Clever use of this stationary item.
Here's a closer look at the heart lock and you can see the re-enforced clear circle better in this photo:
This is a very thoughtful gift from my new craft friend.........thank you, Arleen!!!!