


Ice skates: Cuttlebug Swirl embossing folder on the white boot with Stardust Stickles. Sponge the edges with Bashful Blue ink, then attach the Silver skate. The sparkly ties are actually yarn that can be found in any craft store. Gift Card envelope made by using Recollections Jolly and Bright Paper Pad

Each gift card is stamped using the Punkin Patch Holidays Traditions stamp which can be found here.

Gingerbread Man: Recollections Kraft paper with a Cuttlebug Dot Embossing folder, sponged SU Close to Cocoa Ink on the edges. See the Stardust Stickles outline on the Gingerbread Man? Gift envelope paper is from Creative Imaginations by Samantha Walker. Gold yarn used for "hair"
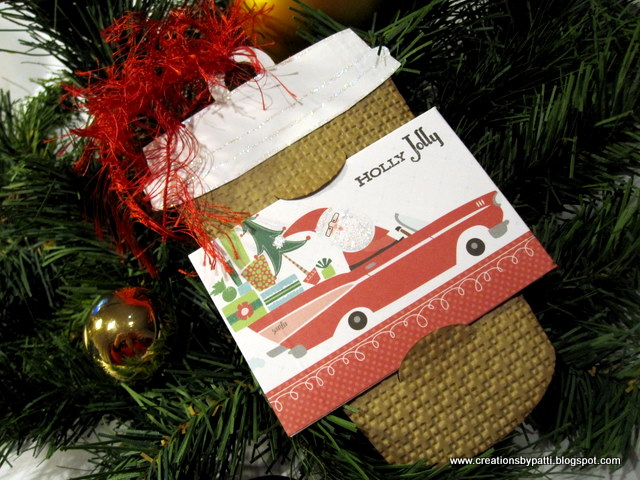
Coffee Cup: Recollections Kraft paper with SU Square Lattice embossing folder, Stardust Stickles on the lid. Red Yarn used through loop. Envelope made using Recollection Jolly and Bright Paper Pad. Stamp "Holly Jolly" is from PTI (Paper Trey Inc) Holiday Lights

Football: Kraft Recollections paper using the Cuttlebug Tiny Mosaic embossing folder. White yarn through the loop and Creative Imaginations by Samantha Walker used for the envelope.

Stack of Shoes: Recollections Kraft used for the shoe box bottoms with a striped Cuttlebug embossing folder and some sponged edges using SU Close to Cocoa ink. Red paper is from The Paper Company. Recollections White used for the lids. Emboss the shoebox lids with Cuttlebug Swirls, then apply Gold Smooch on the swirls. Add Gold Smooch to the inside shoe outline for that glam look. Then Gold sparkle yarn through the loops. Envelope is stamped in Versamark ink with "Merry Christmas" from the Punkin Patch Holiday Traditions, then embossed with Gold Powder.
Ornament: Red paper from The Paper Company, embossed using Cuttlebug folder (sorry, I didn't track the name of this folder), then add Red Stickles to the berries. Silver paper is from American Crafts. Envelope made using Recollection Jolly and Bright Paper Pad with stamped message from Punkin Patch Holiday Traditions using the SU Large Oval punch........lastly, add that Silver Yarn for more sparkle

Gingerbread Man: Recollections Kraft paper with a Cuttlebug Dot Embossing folder, sponged SU Close to Cocoa Ink on the edges. See the Stardust Stickles outline on the Gingerbread Man? Gift envelope paper is from Creative Imaginations by Samantha Walker. Gold yarn used for "hair"

Coffee Cup: Recollections Kraft paper with SU Square Lattice embossing folder, Stardust Stickles on the lid. Red Yarn used through loop. Envelope made using Recollection Jolly and Bright Paper Pad. Stamp "Holly Jolly" is from PTI (Paper Trey Inc) Holiday Lights
Football: Kraft Recollections paper using the Cuttlebug Tiny Mosaic embossing folder. White yarn through the loop and Creative Imaginations by Samantha Walker used for the envelope.

Stack of Shoes: Recollections Kraft used for the shoe box bottoms with a striped Cuttlebug embossing folder and some sponged edges using SU Close to Cocoa ink. Red paper is from The Paper Company. Recollections White used for the lids. Emboss the shoebox lids with Cuttlebug Swirls, then apply Gold Smooch on the swirls. Add Gold Smooch to the inside shoe outline for that glam look. Then Gold sparkle yarn through the loops. Envelope is stamped in Versamark ink with "Merry Christmas" from the Punkin Patch Holiday Traditions, then embossed with Gold Powder.

Ornament: Red paper from The Paper Company, embossed using Cuttlebug folder (sorry, I didn't track the name of this folder), then add Red Stickles to the berries. Silver paper is from American Crafts. Envelope made using Recollection Jolly and Bright Paper Pad with stamped message from Punkin Patch Holiday Traditions using the SU Large Oval punch........lastly, add that Silver Yarn for more sparkle

Iphone: paper used from SU: Dark Grey, Light grey, edges sponged with black. American Crafts shiny black paper used for the "screen". SU retired DSP used for the gift envelope with Punkin Patch Holiday Traditions stamp. Colorful buttons are scraps of paper used.

Princess Castle: three shades of pink used for this gift card: All SU Pretty in Pink, Pink Pirouette, and Pixie Pink. The roof is embossed using SU Square Lattice embossing folder and the castle is embossed using Sizzix Bricked embossing folder. Tie it off with hombre fancy yarn and a fabulous Hello Kitty paper for the gift card envelope. Stamped message "Merry Christmas" using SU Pixie Pink ink is from Punkin Patch Holiday Traditions

These are lots of fun to make - they are so quick using SCAL3. Scraps come in handy for this project BUT I got lots more scraps so I guess I will be making more of these since there are more gift cards in the collection.
Have a great 2012............I'll be posting after the New Year!!!