


Today is Christmas. I want to wish you all peace and happiness. May you all have good health and wealth of friends - a toast to all! Enjoy this time with friends and family.
I will be taking a bit of a break for the rest of the year and will resume my blog time later when things are settled.
Have yourself a grand time..................
Saturday, December 25, 2010
Friday, December 24, 2010
Family Holiday Cookie Exchange
OMG - it's Christmas eve.........................
Am busily getting ready for the massive gathering at my house on Christmas: about 60+ relatives (and that's not all of them) will be converging to one location. One of our traditions we started just a couple years ago, a cookie swap. This tradition was inspired by a good friend: Frances C. I loved the idea for people to bake and participate to share what they made. this is such a great activity for Mom and daughters, too.Last year Frances, had us make recipe boxes. This is the same one we all got from her cookie swap I wanted to share with my family. Each participant will receive a box to hold their recipes.

The top is decorated with a cookie stamp from Just Rite using More Mustard ink - it was perfect. Add some red stickles give just a little bling. The scallop circle is from the glitter paper left over from my Halloween Dracula house. The potholder and hot mitten pad is from another stamp set (???) embossed with white powder on Close to Cocoa.

Here's a closer view of the front: The "From my kitchen" Cartridge was used for the recipe word and the gingerbread man. Those measuring spoons are stamped and die cut (non SU) using more mustard card stock. Do you recognize these recipe boxes? They are $1 from your local craft store.

A decorated shopping bag with a bulb ornament is ready for everyone to carry all the cookies home.

This will be one of the fun events planned........................yeek, only one more day to prepare everything so gotta run.....................
Thursday, December 23, 2010
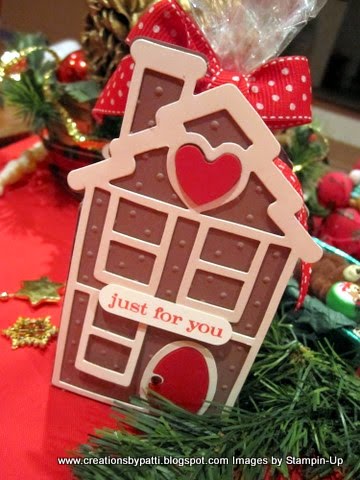
12 Projects: Gingerbread House Tote
A very easy treat to give someone. this is a Gingerbread die which is simple and quick. Finished project size is 2-5/8" x 5" x 1-3/8".

Back (note: no chimney - it was cut off. No Handles, too - they were also cut off)

Inside contained some Gingerbread Cookies and candies:

Supplies:
Back (note: no chimney - it was cut off. No Handles, too - they were also cut off)

Inside contained some Gingerbread Cookies and candies:

Supplies:
- Stamps: Just Believe
- CS: Close to Cocoa, Very Vanilla, Real Red
- Ink: Real Red
- Accys: Word Window Punch , Big Shot Gingerbread House Die (non SU), Dot Embossing Folder, Dimensionals, Red Adhesive Rhinestone (non SU), 5/8" Dot Ribbon (retired), Tombow Adhesive, Sticky Tape.
Thank you for stopping by.....................AND, this project concludes the 12 for the Christmas season. I hope you enjoyed all of them and make versions for the up coming next celebration..........now is that Valentine Day?
Wednesday, December 22, 2010
12 Projects: Milk Carton Treat Trio
Correction to blog inspiration made 12/23:
I love this project.......my inspiration: from Robin who posted her version on 11/5/2010. Her blog: http://www.trinitydesignstudio.blogspot.com/ so ya gotta go by to see it. I added the holder for it. The clothespins allow easy access to the treats inside.

Don't forget to use that Build-a-Brad to secure the bow. Then attach to the holder using a mini glue dot.


Here are the wooden beads used for the feet:
To make this project I used:
(2) Old Olive Milk Cartons,
(1) Real Red Milk Carton,
(1) Old Olive die cut snowflakes to be attached to the Real Red Carton using mini glue dots, pop with dimensional to attach to milk carton.
(2) Real red die cut Snowflakes to be attached to the Old Olive Cartons using mini glue dots, pop with dimensional to attach to milk carton.
Stamp “J” , “O”, “Y” from the Lovely Letters Alphabet stamps set using Real Red Craft ink on Very Vanilla CS - use 1” punch, attach to snowflakes
Carton Holder
(1) 7-1/2” x 4-1/8” Real Red CS, score 1-1/4” around all sides
(2) 1” x 4-3/4” DSP
(2) 1” x 1-3/8” DSP
Assemble carton holder with DSP, wrap 1/4” Old Olive Grosgrain ribbon 14” long around. Use DSP to punch ½” circle for the Build-a-brad, Use to wrap around 7” long ¼” Old Olive Grosgrain to make bow. Attach bow using a mini glue dot.
Apply wood beads to each corner of carton underside holder using mini glue dots.
Supplies:
I love this project.......my inspiration: from Robin who posted her version on 11/5/2010. Her blog: http://www.trinitydesignstudio.blogspot.com/ so ya gotta go by to see it. I added the holder for it. The clothespins allow easy access to the treats inside.

Don't forget to use that Build-a-Brad to secure the bow. Then attach to the holder using a mini glue dot.


Here are the wooden beads used for the feet:

To make this project I used:
(2) Old Olive Milk Cartons,
(1) Real Red Milk Carton,
(1) Old Olive die cut snowflakes to be attached to the Real Red Carton using mini glue dots, pop with dimensional to attach to milk carton.
(2) Real red die cut Snowflakes to be attached to the Old Olive Cartons using mini glue dots, pop with dimensional to attach to milk carton.
Stamp “J” , “O”, “Y” from the Lovely Letters Alphabet stamps set using Real Red Craft ink on Very Vanilla CS - use 1” punch, attach to snowflakes
Carton Holder
(1) 7-1/2” x 4-1/8” Real Red CS, score 1-1/4” around all sides
(2) 1” x 4-3/4” DSP
(2) 1” x 1-3/8” DSP
Assemble carton holder with DSP, wrap 1/4” Old Olive Grosgrain ribbon 14” long around. Use DSP to punch ½” circle for the Build-a-brad, Use to wrap around 7” long ¼” Old Olive Grosgrain to make bow. Attach bow using a mini glue dot.
Apply wood beads to each corner of carton underside holder using mini glue dots.
Supplies:
- Stamps: Lovely letters Alphabet
- CS: Real Red, Old Olive, Very Vanilla, DSP (retired)
- Ink: Craft Real Red
- Accys: SU Exclusive Biog Shot Milk Carton Die, 1/4" Old Olive Grosgrain Ribbon, Northern Frost Sizzlit Strip Die, Build-a-Brad, 1/2" Circle Punch, 1" Circle Punch, Mini Glue Dots, Clear Embossing Powder, Dimensionals, Sticky Tape, Red Wood Beads (non SU), Clothespins (non SU)
Thank You for stopping by today.......................
Tuesday, December 21, 2010
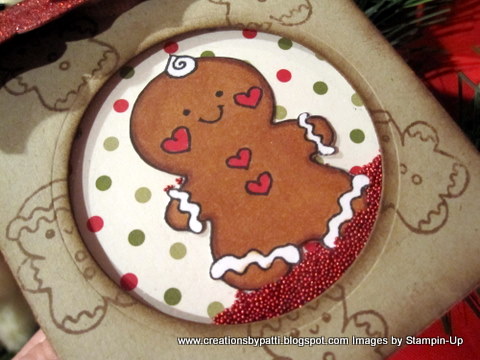
12 Projects: Gingerbread Shaker Box
And you think the Fancy Favor Box is only used for totes? Look at this treat:

A close-up of the shaker with micro beads:

The side view:

Another view:

Open the top:

The treat inside:

To make this project:
Box:
-(1) Fancy Favor Box in Crumb Cake (Kraft) CS, cut out 2-1/8” circle on the 2nd panel from the right, sponge edges with Close to Cocoa ink, randomly stamp small gingerbread man image using Close to Coca ink, apply sticky tape to the 3/8” extension
-(1) 3” x 3” acetate, attach over circle on 2nd panel, attach foam tape, 1 spoon red micro beads. Set aside.
-(1) 3” x 3” DSP (retired SU)
-Stamp (1) Gingerbread man using Staz On or Momento Tuxedo Black ink Whisper White paper. Color with Copic: E27 Africano, E34 Orientale, R37 Carmine or your favorite Stampin' Write Pens. Cut out, center and attach to DSP.
-Then place the DSP on top of foam tape, secure tightly to create shaker..
Topper:
-(1) 3-1/8” x 2-3/4” Red Glitter paper, position 3-1/8” edge on the top of Fancy Favor box to obtain decorative edge, score on the 2-3/4” side 1-1/4”, 1-3/4”
-Use a 1/8” hand held punch 3/8” toward center for 6” long ¼” Chocolate Chip grosgrain ribbon. Secure ribbon using sticky tape or tie a knot.
-Apply sticky tape to topper's 3-1/8” straight edge (which is the back)
-Apply Velcro to topper shaped edge.
-Stamp “enjoy” from the Fabulous Phrases stamp set on Very Vanilla CS using Close to Cocoa Ink, punch using ¾” x 15/16” Medium Punch, sponge edges using Close to Cocoa ink. Attach to lid with dimensionals.
-Fill with treats!
Supplies:

A close-up of the shaker with micro beads:
The side view:

Another view:

Open the top:

The treat inside:

To make this project:
Box:
-(1) Fancy Favor Box in Crumb Cake (Kraft) CS, cut out 2-1/8” circle on the 2nd panel from the right, sponge edges with Close to Cocoa ink, randomly stamp small gingerbread man image using Close to Coca ink, apply sticky tape to the 3/8” extension
-(1) 3” x 3” acetate, attach over circle on 2nd panel, attach foam tape, 1 spoon red micro beads. Set aside.
-(1) 3” x 3” DSP (retired SU)
-Stamp (1) Gingerbread man using Staz On or Momento Tuxedo Black ink Whisper White paper. Color with Copic: E27 Africano, E34 Orientale, R37 Carmine or your favorite Stampin' Write Pens. Cut out, center and attach to DSP.
-Then place the DSP on top of foam tape, secure tightly to create shaker..
Topper:
-(1) 3-1/8” x 2-3/4” Red Glitter paper, position 3-1/8” edge on the top of Fancy Favor box to obtain decorative edge, score on the 2-3/4” side 1-1/4”, 1-3/4”
-Use a 1/8” hand held punch 3/8” toward center for 6” long ¼” Chocolate Chip grosgrain ribbon. Secure ribbon using sticky tape or tie a knot.
-Apply sticky tape to topper's 3-1/8” straight edge (which is the back)
-Apply Velcro to topper shaped edge.
-Stamp “enjoy” from the Fabulous Phrases stamp set on Very Vanilla CS using Close to Cocoa Ink, punch using ¾” x 15/16” Medium Punch, sponge edges using Close to Cocoa ink. Attach to lid with dimensionals.
-Fill with treats!
Supplies:
- Stamps: Fabulous Phrases, Gingerbread man (non SU)
- CS: Crumb Cake (Kraft), Close to Cocoa, Glitter Red Paper (non SU) DSP (retired), Very Vanilla
- Ink: Close to Cocoa (retired),
- Accys: Big Shot Fancy Favor Die, 1/8" Hand Held Punch (retired), 1/4" Chocolate Chip Grosgrain Ribbon, Velcro (non SU), Circle Scissor Cutter, Foam Tape (non SU), Red Micro Beads (retired), Acetate (non SU), 3/4" x 15/16" Punch, Sticky Tape, Sponge Dauber
Thank you for stopping by today.....................
Monday, December 20, 2010
12 Projects: Present Gift Card Holder
This is a great creative Present that holds a gift card: (inspired by www.itsastampthing-vicki.blogspot.com posted 11/1/10) - see her blog for her version:

Flip up the front "lid" to reveal a tab............

Pull out the Gift Card..........

To make this project:
-(1) 4” x 8” Real Red, Score on the 8” side @ 4”, use Round Tab punch at the top opening before adding the solid strips of cards stock in front (it will be too thick), apply sticky tape on two sides
- (1) 3-3/4” x 3-3/4” decorative pattern paper
- (1) ½” x 4” Real Red strip to be applied centered on top of the decorative paper, then (1) ¼” White strip on top of the Real Red
- (1) 4-1/4” x 3”, score on the 3” side @1-1/2”
- (1) 4” x 1-1/4” decorative paper, pop with dimensionals on all sides except top center.
- (3) Red Oval loops + (3) White Oval loops = (6) total loops to be applied to the top (lid) before applying the 4” x 1-1/4” decorative paper.
- Connect the “present” to the ‘lid” with sticky tape in the back, Add Velcro, Add stamped and punched Wide Oval on to the lid.
Gift card Holder Insert:
- (1) 3” x 4” White Card holder, 3/16" Corner round punch all four corners
- (1) Round tab punch white, attach using sticky tape to the holder at back. Apply sticky tape only to the top half of the front. It will be used for holding the gift card at top.
- use slit punch at the bottom, then insert gift card.
Supplies:
- Stamps: Christmas Punch (retired)
- CS: Real Red, Whisper White, DSP (non SU)
- Ink: Real Red
- Accys: Large Oval Punch, Wide Oval Punch, Round Tab Punch, Dimensionals, Sticky Tape, Slit Punch (retired), 3/16 Corner Rounder Punch, Velcro (non SU)
Thank you for stopping by today..................
Sunday, December 19, 2010
12 Projects: Ornament Gift Card Holder
Ornament Gift Card holder (with sleeve)....totally inspired by Dawn Griffith (www.dawnsstampingthoughts.typepad.com) and also Roxy (www.stampingwithroxy.typepad.com)

Closer view of front:

Card insert removed:

Flip up the insert to revel message and gift card:

To make this project:
Outside Holder: (1) 4” x 7-3/8” Real Red CS, score @3-1/2”, 7” along the 7-3/8” side
·Emboss front panel using Vintage Wallpaper Impressions Folder, sponge and face edges using a dauber with Encore Silver Ink
- Apply Sticky tape onto the 3/8” extension
-Die cut ornament and emboss in Silver Foil CS
- Die Cut and Emboss strip of Real Red. Attach to Silver Foil CS. Pop ornament with dimensionals, place on holder front.
- (1) 9” long Silver ribbon, secure with a rhinestone brad to make bow, position through Die Cut Ornament loop – attach using a mini glue dot.
Inside gift card holder: (1) 3-3/8” x 10-3/4” Whisper White CS, score @ 1-12”, 6-1/2”
- Secure 1-1/2” pocket for gift card with sticky tape on each side
- Stamp (3rd generation) Fleur from the using real red ink on front of Inside gift card holder and inside. Stamp message in Staz-on Black ink on top of the Fleur image.
Supplies:
- Stamps: Friends 24-7, Christmas Greetings
- CS: Real Red, Silver Foil (non SU), Whisper White
- Ink: Real Red, Staz-on Black
- Accys: Ornament Die (non SU), Silver Ribbon (non SU, Square Rhinestone Brads (retired), SU Vintage Wallpaper Embossing Folder, Sticky Tape, Dimensionals, Mini Glue Dots, sponge daubers
Thank you for stopping by...........................
Saturday, December 18, 2010
12 Projects: Our Front Door
Our Front Door card– inspired by Calla Lily (www.callalily.wordpress.com on 10/27/2010) Note: measurements tweaked from the original card size.

Side view:

A close-up of the wreath:


These are the pieces of what you should have:

Sponge all those pieces:

Add dimensionals:

The greenery on the side:

Assembling the wreath:


Side view:

A close-up of the wreath:

To make this card:
(1) Card Base: 4-1/4” x 11” Close to Cocoa Card Front
Sponge all pieces with Close to Cocoa
Front Door 2-1/4” x 4-1/4” Real Red CS
Door Panels: (4) 1” x 2” in Real Red CS, pop with dimensionals
Attach (1) Black brad to 4th door panel BEFORE attaching to door.
Door mat: 1” x 2-3/4” (not shown in photo) in Going Gray, sponge edges with Black ink. Stamp message (Warmest Regards stamp set) in on door mat using Black ink.
Foliage details:
Wreath Base: (1) ring – punch 1-1/2, then punch 1-3/4”. Attach leaf pieces on ring with Tombow Adhesive.
Wreath components: 4 Old Olive, 3 Artichoke, 2 Mellow Moss, 3 White MS Leaf Punch =12 total, alternating light and dark colors
Foliage for side pots(6) MS Leaf Punch for each pot in the following order from top to pot opening Old olive, White, Mellow Moss, White, Artichoke, Old Olive
Pots: (2) Small Oval Punch More Mustard CS, cut off both ends, sponge edges, pop with dimensionals
The template:

These are the pieces of what you should have:

Sponge all those pieces:

Add dimensionals:

The greenery on the side:

Assembling the wreath:

Supplies:
- Stamps: Warmest Regards
- CS: Real Red, Close to Cocoa (retired), Old Olive, Artichoke, Mellow Moss, Whisper White, More Mustard, Going Gray (retired)
- Ink: Black, Close to Cocoa (retired), More Mustard
- Accys: SU Square Lattuce Embossing Folder, Dimensionals, Large Black Brad (non SU), Piercer, Leaf Punch (non SU), Small Oval Punch, Sponge dauber, 1-1/2" Circle Punch, 1-3/4" Circle Punch, 1/4" Red Gingham Ribbon (retired), Mini Glue Dots, Tombow Adhesive
Thank you for stopping by today..............
Friday, December 17, 2010
12 Projects: Santa's Wardrobe Card
This could be one of my favorites...........Santa wasn't this messy.....right? Thank you Jackie Topa ( http://www.jackietopa.typepad.com/ for the inspiration):

Santa's Boot's:

Top corner of message insert with red adhesive rhinestones:

Dresser side with Santa's Clothes:


Note card removed side view (Gift card can be attached to the back):

Side view:

Here is the template to make this card: (Template and Instructions previously posted on my blog 9/13/2010 Wicked Cool Dresser)

Colors used for this project:

Since all the "clothes are cut out, no need to "color within the lines".


Santa's Boot's:
Top corner of message insert with red adhesive rhinestones:

Dresser side with Santa's Clothes:

Note card with Santa's Bag:

Note card removed side view (Gift card can be attached to the back):

Side view:

Here is the template to make this card: (Template and Instructions previously posted on my blog 9/13/2010 Wicked Cool Dresser)

Colors used for this project:

Since all the "clothes are cut out, no need to "color within the lines".

Additional instructions:
Components needed:
(1) 5-1/2” x 8-1/2” Kraft CS, use Large Tag punch on dresser bottom, sponge edges with Chocolate Chip ink
(1) 2” x ¾” Drawers, sponge edges with Chocolate Chip ink, add (5) Brads (Note: top drawer does not need a brad on the right side), pop with dimensionals
(1) 2-3/4” x 4” Chocolate Chip CS for insert.
(1) 2-1/2” x 3-3/4” White CS, sponge edges with Chocolate Chip ink
Stamp Background on Whisper White CS using Creamy Caramel ink (or any lighter brown shade)
Stamp message using Chocolate Chip ink on Whisper White on top of stamped background.
Punch (2) Old Olive leaves from the 2-step Bird Punch, adhere to top right corner, add Red Adhesive Rhinestones.
Stamp images using Staz-on or Momento (if using Copics) Black Ink, color using your favorite coloring pens.
Position drawers on left side popped with dimensionals.
Add dimensionals to Santa’s Bag and boots.
Add dimensionals to Santa’s Bag and boots.
Supplies:
- Stamps: Antique Background (retired), Santa's Clothes (non SU)
- CS: Whisper White, Crumb Cake (Kraft), Old Olive, Chocolate Chip
- Ink: Chocolate Chip, Creamy Caramel (retired)
- Accys: 2 Step Bird Punch, large Tag Punch, Red Adhesive Rhinestones (non SU), Gold Brads, Piercer, Sponge Daubers, Dimensionals.
Thank you for stopping by today......................
Thursday, December 16, 2010
12 Projects: Initial Ornament in a Box
This is the 2nd Ornament in a box. This year;s box is pretty special. With participation from a couple friends, this is how the projected was completed. Finished box size is 3-3/8" x 4-1/4" x 1-3/4". The embossing folder is borrowed as well as the decorative boarder punch used on the lid edge.

Take off the lid off (see the decorative punched boarder?) to reveal this year's ornament (last year there was an ornament filled with popcorn). This year's ornament is filled with oh so great snow and the shape is round but "flat".

To make this project:
Lid:
(1) 6-1/8 x 5-3/8” Old Olive CS, score 1” around all edges. Punch edges using any decorative edge boarder punch
(1) 3-1/4” x 4” Cherry Cobbler CS, apply dimensionals, attach to lid
(1) 3-1/8” x 3-7/8” Old Olive CS, emboss using any embossing folder
Stamp Ornament “joy” from the Delightful Decorations stamp set on White CS using Cherry Cobbler ink, use ornament punch, apply dimensionals to back, use silver elastic to make bow – attach with mini glue dot.
Bottom:
(1) 7” x 6-1/4” in Cherry Cobbler CS, score 1-1/2” around all edges, assemble using sticky tape.
(1) Plastic Craft Ornament, fill with faux snow, die cut Big Shot Serif Essentials sticky alphabet, apply Red Ultra fine glitter, brush off excess, apply additional red glitter glue as needed, set aside to dry.
Supplies:
- Stamps: Christmas Punch
- CS: Old Olive, Cherry Cobbler, Whisper White
- Ink: Cherry Cobbler
- Accys: Sticky Pages, Big Shot Serif Essentials Alphabet Die, Ruby Red Ultra fine Glitter, Red Glitter glue (non SU), Ornament Punch, Silver Elastic Cord (retired), Mini Glue dots, Dimensionals, Sticky Tape, Decorative Boarder Punch (non SU), Plastic Ornament (non SU), Snow (non SU).
Thank you for stopping by today......................
Wednesday, December 15, 2010
12 Projects: Joy at Christmas Card
This “Joy at Christmas” card was inspiration from Melanie Watson 11/4/2010 - I couldn't find her blog (or I didn't write it down) and she has a video on how to make the unique opening but wanted to give her so much credit for inspiring me! . I will update this posting if I find it.
Update 12/15 in the afternoon: found the info!!!! yay: the inspiration is from "Let me Stamp" Melany Watson posted on 11/10/2010 and her blog site is www.melanystamps.typepad.com She has a step by step on how to create the Decorative Window used for this card!!!

A closer look at the Extra Large scalloped circle with pierced effect.

Gold Organdy Ribbon tied and attached to the strip of Gold Organdy Ribbon.

To make this card:
(1) (1) 5-1/2” x 8-1/2” in Chocolate Chip, score @4-1/4” along the 8-1/2” side
(1) 5-1/4” x 8-1/4” in Real Red, emboss with Petals-a-Plenty Folder
(1) 4-3/4” x -7-3/4” in Chocolate Chip
(1) 3-1/2” x 3-1/2” in DSP, use Decorative punch to create “opening” – see Melanie’s tutorial (will update later)
(1) 3” x 3” in Real Red – to be positioned behind punched DSP
(1) punched 2-3/8” Extra Large Scallop Circle in Chocolate Chip, pierce scallops, apply dimensionals
(1) Stamp and punch “Joy at Christmas” from the Perfect Phrases stamp set message in Real Red ink on White CS
(1) Stamp and punch “Joy at Christmas” message in Chocolate Chip on White CS – punch out using 1-1/4” circle, pop with dimensional
5/8” wide 7” long Gold Organdy Ribbon, tie bow, attach with mini glue dot.
Supplies:
- Stamps: Perfect Phrases
- CS: Chocolate Chip, Real Red, Whisper White, DSP (retired)
- Ink: Real Red, Chocolate Chip
- Accys: Decorative Punch, SU Exclusive Petals-a-Plenty Embossing folder, 2-3/8" Extra Large Scallop Circle, 1-1/4" Circle Punch, Piercer, Dimensionals, 5/8" Gold Organdy Ribbon, Mini Glue Dot
Thank you for stopping by today................more coming.................
Tuesday, December 14, 2010
12 Projects: December 25th Card
This is the most beautiful Christmas Card: the Champagne Shimmer mist used doesn't even show up on this card at all. This card was CASEd from Jill's Card Creations, her blog: http://www.jill031070.blogspot.com/ - don't you just love it?

Here's the message in the top right corner:

Here is the stamped month: I added the month because my DB (Darling Boyfriend) said 25 what?

To make the card:(no photos of the components)
(1) 5-1/2” x 8-1/2” in Cherry Cobbler, score @4-1/4” along the 8-1/2” side
(1) 5-1/4” x 8-1/4” in Very Vanilla, stamp Christmas Collage stamp set using Soft Suede ink, sponge edges using More Mustard ink. Color leaves, Bells, Berries, Bow, and Poinsettias using markers.
(2) punched Cherry Cobbler Modern Label
(1) Stamped “December” from the Full Calendar stamp set in Soft Suede ink on Very Vanilla, Punch using Modern Label, sponge edges using More Mustard ink. Cut one of the Modern Label punched Cherry Cobbler pieces in half, adhere in back of December.
(1) stamped “wish big” from the Short & Sweet stamp set in Soft Suede ink on Very Vanilla, punch using Word Label punch
Add dimensionals to the back of “wish big” and “December”
Make and use a 2” punched circle template over the "25” to sponge More Mustard ink. Add dimensionals to back of card front, then attach to card.

Sponge the edges and also around the stamped messages:

After all the sponging is completed, spritz (only one pumping) the above with a mister. The economical wat is to get a small sanitizer mister with a min of 2% alcohol from your local drug store, fill with a couple drops of SU Champagne Shimmer ink, shake and spritz..............there you go! And you may even had one of those sanitizers that have such a good subtle scent!!!!
Supplies:
- Stamps: Christmas Collage, Full Calendar, Short & Sweet
- CS: Cherry Cobbler, Very Vanilla
- Soft Suede, More Mustard
- Accys: 2" Circle Punch (for Template), Modern label Punch, Word Window Punch, sponge daubers, Dimensionals, Stampin' Write Pens in Real Red, More Mustard, Old olive, Champagne Shimmer ink, Sanitizer Mister (non SU).
Thank you for stopping by today.........................
Subscribe to:
Posts (Atom)

