Friday, January 29, 2010

Tess's Matchbox Dresser

I am really beginning to love Tess because she is one gal that has many looks. Here I have made her a brunette. Backed with the Brushed Silver CS and popped onto the Extra Large Fancy Flower Punch. Melon Mambo DSP was used to accent this project. Finished project size: 2-3/4" X 3" (to the top of the dresser) x 2". Yes, this project has "feet" made from CS.

A side view:


Closer view of Tess:


The drawers are stamped with the image from "Tiny Tags" , the rhinestone brads are attached (through one layer only so the prongs do not show on the inside). See the feet? They are made using a 3/4" Circle Punch.

Drawer contents: Binder clips, post it notes, Paper clips

Side view of dresser:
In my hurry to complete this project, no photograph of each step to make this project were taken......(ooops)........I will follow up next week on the measurements for the top easel as well as hoe to make those feet.
Supplies:
  • Stamps: Tiny Tags, Tote-ally Tess
  • CS: Melon Mambo, Whisper White, Melon Mambo Patterns DSP, Brushed Silver
  • Ink: Staz-On Black, Melon Mambo
  • Accys: SU Exclusive Big Shot Matchbox Die, 1-3/8" Circle Punch, 1-1/4" Circle Punch, 1/2" Circle Punch, 5/8" Ciurcle Punch (non SU), 3/4" Circle Punch, Extra Large Fancy Flower Punch, Rhinestone Brads, Blush Blossom+Black+Pretty in Pink+Melon Mambo Stampin' Write Pens, Piercer, Sticky Tape, Dimensionals
In the meantime, have a great weekend.....Thank you for coming by to visit...........HUGS!!!!

Thursday, January 28, 2010

Candy Carrying Case

This is my project for the day. Wowsa.........love this little carrying case full of sweets!!! I was thinking of how to make more use of that matchbox die: well........surprise.......and here it is. Finished project size: 4-1/2" x 3 x 1-1/2"

Open the front flap (I used the thinnest Velcro from that "box store"). Reveling the 2 matchbox drawers with the new epoxy brads from the Occasions Mini Catalog.

Open the cover completely to reveal the sweets: The larger candy has Sending Love DSP wrapped around along with punched hearts. The crown stamp is from the Tiny Tags set (Occasion Mini). The Nuggets are also wrapped with the Sending Love DSP and simply punched small heart.

Here's a closer view of the drawer pull (epoxy Brads)

The white taffeta ribbon is tie and applied to the front flap using a mini glue dot.

The handle: using the Scallop Trim Boarder Punch on both sides, is attached to the top using sticky tape.

What you will need for this project:
(1) 4-1/2" x 9-3/4" Pretty in Pink CS, score along the 9-3/4" side 1-1/4", 3", 1-1/2", 3", leaving 1"
(1) 4-1/4" x 1" Sending Love DSP
(1) 4-1/4" x 2-3/4" Sending Love DSP
(1) 4-1/4" x 1-1/4" Sending Love DSP
(1) 4-1/4" x 3/4" Sending Love DSP
Note: no need for the 2nd 4-1/4" x 2-3/4" Sending Love DSP shown in photo - this ended up to be the bottom of the case which does not need to be covered (optional, though)
(2) Matchbox Covers in Pretty in Pink CS
(2) Matchbox drawers in Whisper White
(1) 4-1/4" x 5-5/8" Pretty in Pink for the top drawer, score 3/4" around all 4 sides
(1) 1" x 5-3/4" Pretty in Pink for the handle, score 5/8" on each end
(1) 3/8" x 5-3/4" Sending Love DSP doe the handle, score 5/8" on each end
(8) 3-1/4" X 1" Sending Love DSP for the Nuggets.
(4) 4-1/2" x 1-1/2" Sending Love DSP for the G. Squares
Left photo: Using a piercer, pierce hole for the Epoxy Brad before assembling the drawer. This way the prongs are not shown on the inside.
Right photo: Assemble the top drawer. Apply sticky tape.
Left photo: apply sticky tape connecting both drawer covers as shown. Apply sticky tape to the top box, too
Right Photo: Center and adhere Covers to the case, Remove sticky tape backing from the top box and position on top of the matchboxes.
Left photo: wrap Nuggets as shown
Right Photo: wrap G. Squares as shown

As an after thought, a handle was added so the measurements should be 1" wide and not 3/4" (especially since I punched both sides)
So I hope you enjoyed this project. The sweets CAN be replaced with sticky notes, paper clips, or binder clips......it's not only sweets!
Supplies:
  • Stamps: Tiny Tags
  • CS: Pretty in Pink, Whisper White, Sending Love DSP
  • Ink: Pretty in Pink
  • Accys: SU Exclusive Big Shot Matchbox Die, Scallop Trim Boarder Punch, Heart to Heart Punch, 3/8" White Taffeta Ribbon, 1/2" Pretty in Pink Epoxy Brads, Mini Glue Dots, Sticky tape, Piercer, Velcro (non SU)

Thank you for stopping by today...............HUGS!

Wednesday, January 27, 2010

Give me Hearts

This is a great project.........it started off a bit "simple" but then my light bulb went off!!! Love those tiny hearts!!! I have to say, this project inspiration is from "Flower Bug" - see her blog link on my right side bar...........I visit her often as she so inspires me! I added my own twist with the punched Heart plus Acetate window surrounded by punched smaller hearts....yummy! Finished project size: 3-1/4" x 3" x 2".

Side view:

Back view:

Closer view of the front:

What you will need:
(1) 8-1/2" x 4" Real Red CS, score @4-1/4"

(1) bottom drawer from the Matchbox die in Pretty in Pink
(1) 2-1/2" x 3" acetate
(1) 14" cut 3/8" Pretty in Pink Taffeta Ribbon
punched small hearts in Pretty in Pink, Whisper White, and Welcome Home DSP Pad (saleabration)
The first thing you need is to cut the Top note as follows: After scoring and folding the Real Red CS, position in the top note die. Arrow is pointing to the fold line. Now put through the Big Shot.

To emboss both sides of the top note, place half the CS into the Impression Folder as shown and put through the Big Shot. Do the same for the other side.

This step may be a little tricky:
Position a cut top note "negative" on top of the Mover & Shaper die. I taped it down and this will be used as a guide to position the top note. Place the heart die 1-3/8" from the bottom of the opening. This is enough room to clear the top of the matchbox drawer.

Place the embossed top note on top of the "negative" as shown Put through the Big Shot.

After putting through the Big Shot, this is what it should look like below:

Attach the acetate with mini glue dots. Stamp "love" heart and punch out. Punch out a variety of heart in Pretty in Pink and also Whisper While. I had some scraps from the Good Neighbor DSP Pad and worked that in, too.

Apply sticky tape to the bottom of the assembled matchbox as shown. Score the top note 1" each side of the fold line and fold as shown.

Using a crop-o-dile, punch a large hole for the white eyelet on both sides.

Apply the punched hearts randomly using Tombow Adhesive.

After applying the punched hearts around the opening, add the medium heart and small heart centered on the acetate. Add your favorite candy. Tie a ribbon through the eyelets .......complete!
Supplies:
  • Stamps: I {Heart} Hearts
  • CS: Real Red, Whisper White, Pretty in Pink, Good Neighbor DSP Pad (seleabration)
  • Ink: Real Red
  • Accys: Heart to Heart Punch, SU Exclusive Mover & Shaper Big Shot Die, SU Exclusive Big Shot Top Note Die, SU Exclusive Big Shot Matchbox Die, SU Perfect Polka Dots Textured Impressions Folder, 3/8" Pretty in Pink Taffeta Ribbon, Tombow Glue, Sticky Tape, Crop-o-dile, White Eyelets (non SU), Acetate (non SU)

Thank you for stopping by today .............enjoy and create!!! HUGS!!!!

Tuesday, January 26, 2010

Love You Flag Card #2

Here's another color of the Love You Flag card (previously posted on 1/22/10) using the Sending Love DSP. The front belly band panel has been changed to have the "love" die cut from the Big Shot Join in the Cheer Decorative Strip Die. I can't decide which color I like best (but of course, silly: the RED one posted 1/22/10). Love this double sided specialty DSP - one side has glitter and one side is regualr print.......love this!!!

A closer look at the belly band. The Tiny Tag is using sewing thread to tie onto the "e". The Scallop Trimmed Pretty in Pink Panel finished measurement is 3-1/4" x 2-1/4". The DSP is then popped with dimensionals while the Polka Dot punched Full Hear is adhered on top using snail adhesive. "Love" is also applied on top of the heart using snail adhesive, too.

Here's the card slightly opened to show the flag message: always, XO XO, and you. Note there is a change I made in the right and left inside: the pocket panels are flush with the card edge. This provides a bit more stability.

Top view:

Right side tags:

Right side pocket :


Left side Tags:

Card fully opened
:

Here is the "you" definition:

And here is the "X O X O" definition:

And the "always" definition:
Another peek inside when the card is almost opened:
For measurements on how to make this card, refer to posting on 1/22/10.
Supplies:
  • Stamps: Tiny Tags, Define Your Life, With all my Heart
  • CS: Very Vanilla, Pretty in Pink, Close to Cocoa, Sending Love DSP
  • Ink: Pretty in Pink, Close to Cocoa, Versamark
  • Accys: SU Exclusive Big Shot Two Tags Die, SU Exclusive Join in the Cheer Decorative Strip Die, 3/16" Corner Rounder Punch, Scallop Trim Boarder Punch, Scallop Trim Corner Punch, Full Heart Punch, SU Perfect Polka Dots Textured Impressions Folder, 1/4" Pretty in Pink Grosgrain Ribbon, 1/4" Chocolate Chip Grosgrain Ribbon, Crop-o-dile, Sticky tape
Thank you for stopping by today..................HUGS!!!

Monday, January 25, 2010

Lollypop Flower Favor

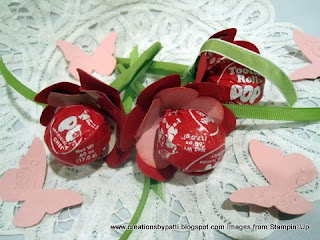
Here are the cute Tootsie Pop Flowers I made today. These were inspired by a swap I received at Leadership. I don't have the Big Shot Flower Folds Die so I used a punches to make this. One Flower pop is using solid CS while the others are using that fabulous new DSP: Sending Love.
Here the flowers sit in a small glass container:

Here's the underside of the flower:

To make these flowers:
Left Photo:
(3) Punched full hearts in Real Red CS
(1) Punched Extra Large Fancy Flower in Pretty in Pink CS
(1) 1-1/4" x 3-1/2" Old Olive CS
Right Photo: Trim hearts 1-1/2" from the point of the heart as shown
Left Photo: Clip hearts as shown about 1/2"
Right Photo: Clip Punched Flower as shown, about 1/2"
Left Photo: Using the Crop-o-dile large hole, punch center
Right Photo: Sponge edhes of the Flower using Real Red ink
Left Photo: after thread the Tootsie Pop stick through, adhere the hearts around the stick using sticky tape. Tip: use invisible tape to tightly wrap around the Tootsie Pop wraper.
Right Photo: Light mark, with a pencil 1/2" as shown. (width of Old Olive strip shuld be 1-1/4" not 2" as in photo)

Left Photo: clip the Old Olive 1/8" apart to the pencil line.
Right Photo: Apply sticky tape on one side to adhere to the Tootsie Pop stick and on the other side to "close" the Old Olive strip. Tie ribbon around stick.

Supples:
  • Stamps: none
  • CS: Real Red, Pretty in Pink, Senmding Love DSP
  • Ink: Real Red
  • Accys: Full Heart Punch, Extra Large Fancy Flower, Stamping Sponge, Sticky Tape, 1/4" Old Olive Grosgrain Ribbon

Thank you for stopping by to see my project today...............HUGS!!!